For every birthday that I can remember, my mom has baked me a red velvet cake. Each person in the immediate family has their particular favorite cake and mine happens to be red velvet.
Just for fun: here’s a picture of a red velvet cake that I made at Christmas time for college roommates. I managed to burn some of the cake drippings, causing a fire in the oven. But the cake was still delicious, even if it wasn’t pretty.
The unique taste of red velvet cake is accomplished with buttermilk and cocoa powder. There’s a subtle tang from the buttermilk and almost imperceptible and entirely unplaceable bitter quality that manages to edge out the overwhelming sweetness of most cakes. That’s the cocoa powder talking.
But what truly completes this masterpiece (for both the eyes and the tastebuds) is the cream cheese frosting. Oh my.
Smooth, rich, sugary, thick, tongue-coating, I-don’t-want-to-answer-your-questions-about-what-I’m-going-to-do-with-my-life-because-I’m-doing-it-right-now cream cheese frosting.
Yes.
My mom loves me so much, she’s baked me a red velvet cake every year that I’ve been at school, too. (I regret to count them) but that’s six years.
And every year, we (the cake-bearing party and I) eat cake. Then, the rest goes home with me.
And I eat red velvet cake for breakfast, lunch and dinner until the cake is gone. And the plate is licked clean. Even the plastic wrap that went over the cake sometimes gets a good tongue swipe.
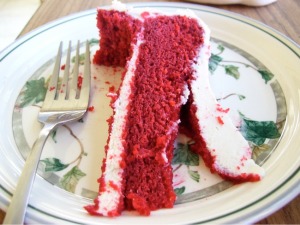
But eating the cake is an art form. The pictures give a little idea but I’ll spell it out for the private school kids. (When I switched from private to public, all the teachers gave me the same courtesy.)
First, eat the red part. Savor the moistness of the cake, but leave enough clinging to the cream cheese edges so there are thick slabs of icing lined with cake crumbs.
Be sure to drink lots of milk during this part.
Then, take smallish bites of cream cheese frosting with a dash of red crumbles for pizzazz. Savor every forkful. Eat until the plate is empty or tummy is satiated.
Repeat at your leisure.
Red Velvet Cake
Ingredients:
1 cup butter (2 sticks)
2 cups sugar
2 eggs
1 cup buttermilk
1 oz. red food coloring (one of the little bottles)
2 tbsp. cocoa
2 1/2 cups cake flour
2 tsp salt
1 tsp vanilla
1 tbsp vinegar
3/4 tsp soda
For the icing:
8 oz. cream cheese
1 box powdered sugar
1/2 stick butter
1/2 tsp vanilla
chopped nuts (optional)
Directions:
Preheat oven to 350 degrees Fahrenheit.
Cream buter and sugar. Add eggs one at a time, mixing after each. Add vanilla and blend. Add buttermilk alternating with flour, stir until thoroughly combined.
In a separate bowl, combine coloring and cocoa. Add salt and vinegar. Last, add the soda.
Combine the two mixes.
Pour into two buttered and floured 9″ cake pans.
Bake for 20-25 min.
When the cakes are finished, let them cool on a cooling rack for about 10 min. Run a knife around the edge of the cakes then flip them out onto cooling rack to cool completely.
Icing:
Mix all ingredients together. I have found that the powdered sugar doesn’t get blown out of the bowl as much when added in a few smaller increments rather than all at once.
When cake is cool, ice the top of the bottom layer. Start by globbing a big bit of icing in the middle and spreading out towards the edges, trying to get an even coating. Place the top layer on top. Frost the top (using the same strategy as stated above) and the sides of the cake.
Now enjoy! And if your cake turns out like my first picture, don’t be sad. It should still taste great! 🙂


